The touchpad on a Lenovo laptop is an essential input device, particularly for users who prefer not to use an external mouse. However, there can be instances where the touchpad becomes unresponsive or locked, leading to potential frustration. Whether it’s accidentally disabled or due to a software issue, this guide will provide comprehensive steps to unlock and re-enable the touchpad on your Lenovo laptop.
Check the Function Keys
Lenovo laptops often have a function key dedicated to enabling or disabling the touchpad. This key is usually located among the F1 to F12 keys and is marked with a touchpad icon.
Step-by-Step Process:
Hold down the Fn key, typically located at the bottom left of the keyboard.
While holding Fn, press the function key that has the touchpad icon (commonly F6, F8, or F9, depending on the model).
Release both keys and check if the touchpad is responsive again.
Enable Touchpad via Windows Settings
If the function key approach doesn’t work, you can manually enable the touchpad through the Windows settings.
Step-by-Step Process:
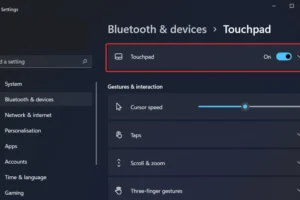
Press Windows + I to access the Settings menu.
Navigate to Devices, then select Touchpad from the sidebar.
Ensure that the toggle under the “Touchpad” option is set to the “On” position.
Adjust sensitivity and other settings as necessary.
This method is particularly useful if the touchpad is disabled due to a system update or configuration change.
Update or Reinstall Touchpad Drivers
Outdated or corrupted drivers can be another reason why the touchpad might not be working. Keeping drivers up to date is crucial for maintaining device functionality.
Step-by-Step Process:
Open Device Manager by pressing Windows + X and selecting it from the list.
Expand the Mice and other pointing devices category to locate your touchpad driver.
Right-click on the driver and choose Update driver.
Select Search automatically for updated driver software to let Windows find the latest version.
If updating doesn’t resolve the issue, right-click again and select, then restart your laptop. Windows should reinstall the driver automatically upon reboot.
Enable Touchpad in Lenovo Vantage or BIOS Settings
Lenovo Vantage is a software suite that provides a variety of system settings, including touchpad options. If you have Lenovo Vantage installed, you can enable the touchpad through this software.
Using Lenovo Vantage:
Open Lenovo Vantage from your Start menu.
Go to the Device section and find the touchpad settings.
Ensure that the touchpad is enabled.
Accessing BIOS Settings: In rare cases, the touchpad may be disabled in the BIOS (Basic Input/Output System), especially if it has been turned off during troubleshooting or by a third-party application.
Step-by-Step Process:
Restart your Lenovo laptop and repeatedly press F2 or Delete to enter the BIOS setup screen.
Use the arrow keys to navigate to the Configuration tab.
Look for the Internal Pointing Device option and make sure it’s set to Enabled.
Save your settings and exit the BIOS.
Restore the System to a Previous Point

If the touchpad stopped working after a recent update or software installation, performing a system restore might help.
Step-by-Step Process:
Type Create a restore point in the Windows search bar and select it.
In the System Properties window, click System Restore.
Follow the prompts to choose a restore point from a date when the touchpad was functioning correctly.
After the restoration is complete, check if the touchpad is now working.
Check for Physical Damage
Physical damage or debris can also cause the touchpad to stop working. Ensure the touchpad surface is clean and free of any dirt or particles that might interfere with its sensitivity.
Steps to Inspect Physical Condition:
Turn off the laptop and unplug it from any power source.
Gently clean the touchpad with a soft, lint-free cloth.
Check for any visible cracks or damage.
If you suspect physical damage, it may be necessary to consult a professional technician for repairs.
Use an External Mouse Temporarily
While troubleshooting the touchpad, using an external USB mouse can be a helpful temporary solution. This allows you to navigate the system and perform necessary updates or changes without relying on the touchpad.
Steps to Connect an External Mouse:
Plug the USB mouse into an available port on your Lenovo laptop.
Windows should automatically recognize and install the necessary drivers.
Use the external mouse to follow the steps mentioned above to unlock or troubleshoot the touchpad.
Unlocking the touchpad on a Lenovo laptop can typically be done with a few simple steps, whether by using the function keys, adjusting Windows settings, or updating drivers. If these methods do not resolve the issue, checking BIOS settings, inspecting for physical damage, or even using an external mouse as a workaround may be necessary. By following this comprehensive guide, you can restore full functionality to your Lenovo laptop’s touchpad and continue using your device with ease.